Volume 10
Chapter 66
372 - Clocking The HackRF 2016-10-31
I have a station clock that generates a 10 MHz sine wave that I need to get to the HackRF receiver to lock it down in frequency. As it is the HackRF will wander around several hundred Hz, before it gets warmed up. The station depends on being able to isolate signals that are on the order of 1-2 Hz wide and stay within a few FFT bins so any drift at all will defeat the search algorithm.
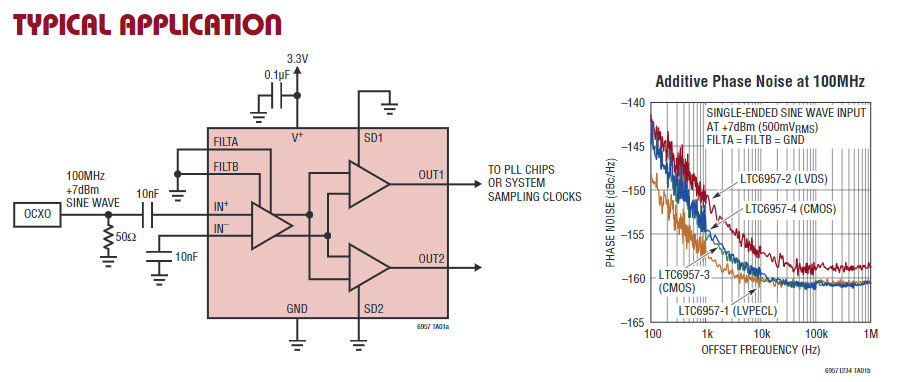
The clock is fine. It is managed by my station disciplinarian, Lady Heather, who insures that the clock is locked to the GPS signals and it simply does not drift. The problem is that the clock generates a sine wave +/-800 mV but the HackRF requires a square wave CMOS signal (3.3V). I have ordered three Linear Technologies chips (LTC6957) that should do the job.
When they arrive I'll set up a test system and decide how to send the square wave to the HackRF.
371 - Operating with HackRF 2016-10-30
I now have a receive chain that includes my HackRF One up and running. You can see it here. Many problems remain (of course). One of the most immediate is the way I'm managing the frequency steps in the AutoScan mode.
The way its suppose to work is that the system starts at a specific frequency collecting data over the receiver bandwidth. The current bandwidth is 16 KHz from the SDR# software. If I am collecting and analyzing say 4,000 lines before I search for ET the receiver will have chirped down band at approximately 0.1 Hz/Second. So from a starting point the receiver 'backs down' until a new scan is started. This is not working the way I envisioned it. Close but still not right
370 - Building HackRF Host Software 2016-10-12
(updated 2019-08-12)
The problem is to build mossmann/hackrf/host with Windows tools.
MAKE - First thing is to create the make files. I attempted to do the make with the CMake GUI but found it less than useful so I switched to the command line and finally had some success.
This is the process that worked finally.
- Uninstall any old CMake you may have on your computer
- Installed CMake- I have version 3.14.1from cmake.org. I used Windows win64-x64.Zip and installed into C:\CMake
- Download libusb-master.zip from https://github.com/libusb/libusb
- Unzip it into: C:\libusb-master
- Start Visual Studio 2019 and navigate to: C:\libusb-master\msvc.
- Select 'libusb_static-2015.vcxproj' and open the solution. VS upgrades to 2019 tool set
- Select Solution Configuration to 'Release' and Solution Platform to 'x64'. and build the solution.
- Downloaded 'pthreads-w32-2-9-1-release.zip' and un-Zip at C:\pthreads-w32-2-9-1-release. This directory now contains:
- Pre-built.2
- pthreads.2
- QueueUserAPCEx
- Downloaded mossmann/hackrf from . Git repository. I used 'Clone or download' option and picked up the Zip (hackrf-master.zip). I used the 'Extract Here' to build the C:\hackrf-master directory which contains:
- C:\hackrf\host\cmake
- C:\hackrf\host\hackrf-tools and
- C:\hackrf\host\libhackrf
- Change the directory name from C:\hackrf-master to c:\hackrf
- This step not necessary in the latest release. Open C:\hackrf\host\libhackrf\src\hackrf.c and add the HAVE_STRUCT line to the file:
- #include <libusb.h>
- #define HAVE_STRUCT_TIMESPEC
- #include <pthread.h>
- Navigate to C:\hackrf\host\cmake
- Navigate to C:\hackrf\host\cmake
- Start a cmd window with administrative privileges at this directory

Paste in the command line
cmake ../ -G "Visual Studio 16 2019" ^
-DLIBUSB_INCLUDE_DIR=C:\libusb_master\x64\Release\lib\libusb-1.0(static) ^
-DLIBUSB_LIBRARIES=C:\libusb_master\x64\Release\lib\libusb-1.0.lib ^
-DTHREADS_PTHREADS_INCLUDE_DIR=c:\pthreads-w32-2-9-1-release\Prebuilt.2\include ^
-DTHREADS_PTHREADS_WIN32_LIBRARY=c:\pthreads-w32-2-9-1-release\Prebuilt.2\lib\x64\pthreadVC2.lib
And run it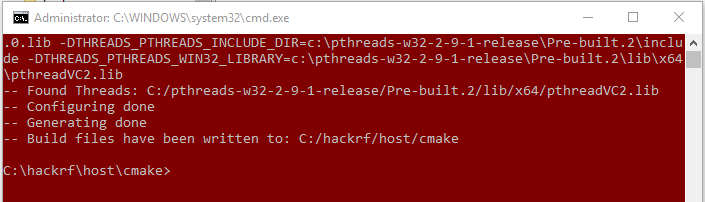
You are ready to compile from the build files at C:/hackrf/host/cmake.
- Start Visual Studio again and open the solution ALL_BUILD
- Build this as either a Debug or Release x64.
- The execuitbles are at: C:\hackrf\host\cmake\hackrf-tools\src\Debug
- Copy the two DLL's to the directory your going to execute from (example: C:\hackrf\host\cmake\hackrf-tools\src\Debug
- hackrf.dll from C:\hackrf\host\cmake\libhackrf\src\Debug and
- pthreadVC2.dll from: C:\pthreads-w32-2-9-1-release\Pre-built.2\dll\x64
- Run the exe (hackrf_info.exe) and be amazed:

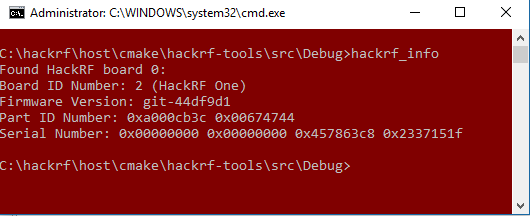
Many thanks to Dominic Spill and Justin B of the HackRF-dev mailing list to providing their knowledge and patents to help a new bee like myself.
369 - DSD+ 2016-09-26
I am thinking about using the DSD+ plug-in for SDRSharp as a way to access the streaming data from the SDR software for my own purposes. To do that requires among other things that the LAME_enc.DLL be installed and that the DSD+ software is setup correctly. This is the setup instructions scraped off of the Russian web site and converted to English so I don't have to download them and translate a 1,000 times a day.
=====================
Instructions for setting up and SDR # DSD + using DSD Interface plug-in.

Setup Procedure:
1. Set DSD Interface plug- in SDR #. The plug in takes the signal after demodulation. As shown in Plugins.xml plug in file is better to have higher DAP plug-ins and DNR.
2. Set the VB Cable . You can use Virtual Audio Cable but VB cable is more stable. After installing the system an additional virtual audio device will appear. Him we will use to connect to the SDR # DSD +. It is necessary to go to the settings of audio devices windows ( Start / Control Panel / Sound / Playback / VB cable / Advanced / default format ), and set the VB cable 16 bit 48000 Hz for playback and recording. This will prevent additional oversampling signal.
3. Set the DSD + .
4. Start SDR #. The menu Configure plug-in to configure the file location DSD.exe.
5. Run the DSD Etpu Start the DSD . In the resulting number of inputs / outputs of the DSD will be displayed window. We must remember VB Cable entry number and the number of output on your sound card in the system. Stop DSD.
6. Configure + the DSD the Configure - input Input audio device to a virtual cable, and outputOutput audio device to your sound card. Rooms are memorized earlier. Other parameters can be as long as you keep the default. After experimentally find the optimal parameters.
7. Set the audio plug Audio device on the previously installed virtual cable (Vb Cable Input) and set a tick the Enable aux the audio output .
Basic settings are completed. Start the receiver modulation type NFM and WFM band Filter bandwidth of 8,000 - 15,000 Hz. + Run the DSD Etpu Start the DSD . In the oscilloscope when the squelch is open, you should see the input signal, it should not be up to the top and bottom limits. The signal level is regulated by a regulator Volume on the plug outlet. DSD + does not like the offset of the received signal frequency. For fine-tuning, you can use the IF spectrum ZoomFFT plugin.
368 - Telnet Commands
The Net Remote allows the following command protocol between the SDRSharp Controller and SDRSharp application. All transfers are JSon formatted AnsiStrings:
Starting Telnet:
telnet localhost 3382
returns:
{"Name":"Net Remote","Version":"1.0.5282.28765"}
There are Getters, Setters and Executes.
Getters, Setters and Exe:
{"Command": "Get", "Method": "<method>"}
{"Command": "Set", "Method": "<method>", "Value": <value>}
{"Command": "Exe", "Method": "Start" or "Stop" or "Close"}
Examples:
- {"Command": "Get", "Method": "IsPlaying"} returns: {"IsPlaying":true}
- {"Command":"Get","Method":"Frequency"} returns:
{"Result":"OK","Method":"Frequency","Value":88300000} - {"Command": "Set", "Method": "AudioGain", "Value": 55} returns: {"Result":"OK"}
- {"Command": "Exe", "Method": "Stop"}
- Error returns: {"Result":"Error","Type":"Value error","Message":"Value missing"}
The <method> entry can be any of the left column:
The <values> can be any of the right column.
| Method | Values Get or SET |
| AudioGain | Volume <25-60> |
| AudioIsMuted | Mute <true|false> |
| CenterFrequency | Centre displayed frequency <0-999999999999> |
| Frequency | Tuned frequency <0-999999999999> |
| DetectorType | Demodulation <AM|CW|DSB|LSB|NFM|RAW|USB|WFM> |
| IsPlaying | Currently playing <true|false> |
| SourceIsTunable | Tunable device <true|false> |
| SquelchEnabled | Squelch <true|false> |
| SquelchThreshold | Squelch level <0-100> |
| FmStereo | FM stereo <true|false> |
| FilterType | Filter type <1-6> |
| FilterBandwidth | Filter bandwidth <0-250000> |
| FilterOrder | Filter order <0-100> |
367 - New Receiver
I have finally made some progress on incorporating the HackRF One receiver into the system.
This is the plan:
- Make use of SDRSharp - SDRSharp is a well designed application for Windows that controls the HackRF as well as many other Software Defined Radios.
- Add Net Remote - SDRSharp Net Remote is a plug in for SDRSharp that allows external software to control SDRSharp (and therefor the HackRF) using Telnet protocol. This plugin was created by Ear To Ear Oak.
- Create SDRSharp Controller - This will be a Delphi application that is built on the R7000 receiver now in place. It will make the Telnet connection to the Net Remote plug in and allow it to set the SDR Receiver frequency and operating mode.
This scheme will allow the R7000 receiver control over the SDR (the HackRF). When the physical tuning knob on the R7000 is spun it should set the frequency on the HackRF. Changing the R7000 receiver mode (AM, FM, FMn and SSB) should be reflected in SDRSharp and passed on to the HackRF.
The SDRSharp Controller will then be able to be incorporated into the SETI Control panel so that the SETI system can make use of the HackRF hardware.
The problem still remains - How to route the output of the HackRF hardware to a new Spectrum Analyzer for analysis.
So that's the plan. We will see how well it pans out.